
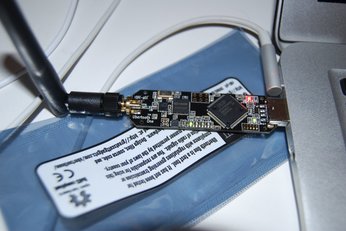
 Today my Ubertooth One arrived. I ordered this for a couple of reasons… but the main, pressing reason was I wanted to better understand Bluetooth Beacons and I need a way to packet capture in a promiscuous mode much like I can with WiFi. It seems that the Ubertooth One is the simplest and cheapest solution available - from what I found ultimately it was the only option. The Ubertooth One was created by Michael Ossmann and Dominic Spill from Great Scott Gadgets. There are a lot of instructions available… and as long as this isn’t your first time using the make command (http://linoxide.com/how-tos/linux-make-command-examples/) and you aren’t scared to type a few commands in to a terminal, command only, window then getting started isn’t too much work. If you aren’t a programmer then having some experience and patience in searching the Internet for answers then give it a go. There are some dependencies and I found this was the best place to get started: https://github.com/greatscottgadgets/ubertooth/wiki/Getting-Started but there are many other websites you will visit in the initial stages of getting your Ubertooth One going. I had to compile the firmware as the ready to go package was considered old for the host tools. https://github.com/greatscottgadgets/ubertooth/wiki/Firmware I found this out, because someone else had the issue: https://github.com/greatscottgadgets/ubertooth/issues/228 I used the latest GNU-ARM-Embedded toolchain https://developer.arm.com/open-source/gnu-toolchain/gnu-rm/downloads rather than the older one that was linked to elsewhere. Maybe this was good, maybe bad… It works! Here was a great piece of learning… Bluetooth packets start with a code that is based on the Lower Address Part (LAP) of a particular Bluetooth Device Address (BD_ADDR). The BD_ADDR is a 48 bit MAC address, just like the MAC address of an Ethernet device. The LAP consists of the lower 24 bits of the BD_ADDR and is the only part of the address that is transmitted with every packet. I was able to sniff these LAP’s simply with the Ubertooth One as soon as firmware was flashed and libraries and host tools installed.
Simply capturing Bluetooth in Wireshark https://github.com/greatscottgadgets/ubertooth/wiki/Capturing-BLE-in-Wireshark But the info didn’t contain what I was expecting… And then I found this… https://github.com/greatscottgadgets/libbtbb/issues/14 I need to compile some plugins for Wireshark so that it can decode the data coming from the Ubertooth correctly. It looks like there is a Mac OS bug. Next Stop Linux… More to come. Interesting reading and watching: Ubertooth Getting Started: https://github.com/greatscottgadgets/ubertooth/wiki/Getting-Started So you want to track people with Ubertooth: http://ubertooth.blogspot.com.au/2012/11/so-you-want-to-track-people-with.html I highly recommend watching this youtube video where Michael Ossmann discusses the difficulties of Bluetooth capture and more https://www.youtube.com/watch?v=KSd_1FE6z4Y Where to buy: https://www.ozhack.com/shop/bluetooth/ubertooth-one/ - For the Australian's https://greatscottgadgets.com/ubertoothone/ - for a whole range of international resellers
Comments
Every year I donate money to the Wikimedia foundation. If the organisation sounds familiar but you are not sure why it's because you most likely use one of their biggest contributions to the world - Wikipedia.
Every week, some weeks multiple times, I reference and learn from the wealth of information that can be found within Wikipedia. This information is of course contributed by volunteers (essentially) who don't receive payment for their writings and then potentially re-edited by others who have a differing view, opinion or understanding of the topic. It's the openly editeditable nature that leads some to mark Wikipedia as an unreliable source of information. That's fine, I use it all the time and learn a heck of a lot. One website will never be my only source of learning so I build my own resilience to misinformation - at least as good as the common man - and thus I personally vouch for the overall richness of Wikipedia, at least for the topics that interest me. I give $10. I feel a small amount of good through making a donation to a non-profit organisation that directly benefits me. Critically important to assisting the good feeling is making the process to give simple, hoopless and fast. The Wikiemedia Foundation has not gone the path of many charities where they require direct debit capability and an ongoing commitment with monthly "subscription" style payments (a practice of which I can appreciate the benefits - but frankly it turns me off). With a simple website I am able to select a $10 donation amount. Other options are available, including a subscription, and it is possible to manually enter an amount also. The modes of payment are simply PayPal or Credit Card/Debit or BPay and the transaction is no fuss and requires as few clicks as are necessary. They have done it right. I do get very polite emails once an a while from Jimmy Wales, the Wikipedia Founder, asking simply for another donation. He keeps it short and to the point and is clearly grateful. I find the entire thing admirable... maybe it helps that I am a beneficiary in that I can use the site... I won't self-analyse too deeply. So, the donation goes towards (as copied from the payment site): Technology: Servers, bandwidth, maintenance, development. Wikipedia is one of the top 10 websites in the world, and it runs on a fraction of what other top websites spend. People and Projects: The other top websites have thousands of employees. We have about 300 staff to support a wide variety of projects, making your donation a great investment in a highly-efficient not-for-profit organization. Cool! So I know how much I'm paying... I know who I'm paying and most importantly I know what they use the money for. I use Wikipedia a lot. Sometimes I find myself surprised that I'm reading a Wikipedia page. It's because there is a distinct lack of adverts and bulky noise that make up the rest of the Internet. There is little to take your attention away from the stuff that matters. You might find this too. I suspect if you're in a technical field and you look to the Internet for quick info you'll find Wikipedia is a common source for you as well. Maybe it's time to help them out? Just a little bit... Thanks Wikimedia Foundation, Thanks Jimmy and thanks to all the Wikipedia contributors. I was fortunate enough to have some alone time with NetScout’s brand new AirCheck G2 (announced May 17, 2016). I tried to play with every feature and capture every screen but there are just so many tricks in this handy box… Here is what I liked.
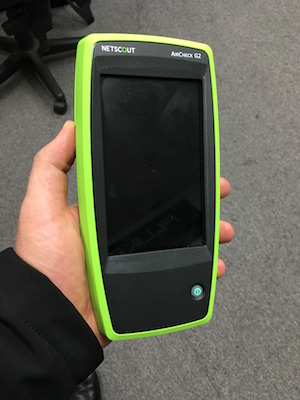
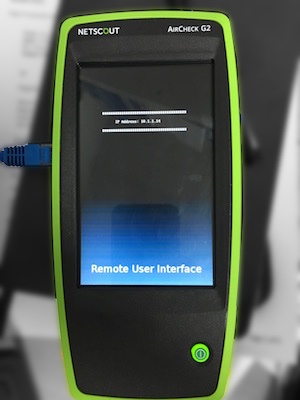
The AirCheck G2 is green, very green! I find it difficult to identify how I actually feel about the old yellow or the new green. The colour does provide a critical function as hand held tools are easy to put down and leave somewhere. Bright colours aid finding and reminding not to leave the unit behind. This is a tool for people tasked with any variation of the following roles: managing, maintaining, installing, securing, troubleshooting, testing, hacking, supporting and auditing wireless networks. Within 10 seconds of being turned on the AirCheck begins to scan the nearby wireless environment. It collects information about networks, Access Points, clients and channels which are all accessible under corresponding menu buttons on the home screen. You can tell your AirCheck is working hard in the background as it indicates the current channel being scanned at the top of the screen. It’s also likely the counters indicating found networks, Access Points and clients are increasing on each button.
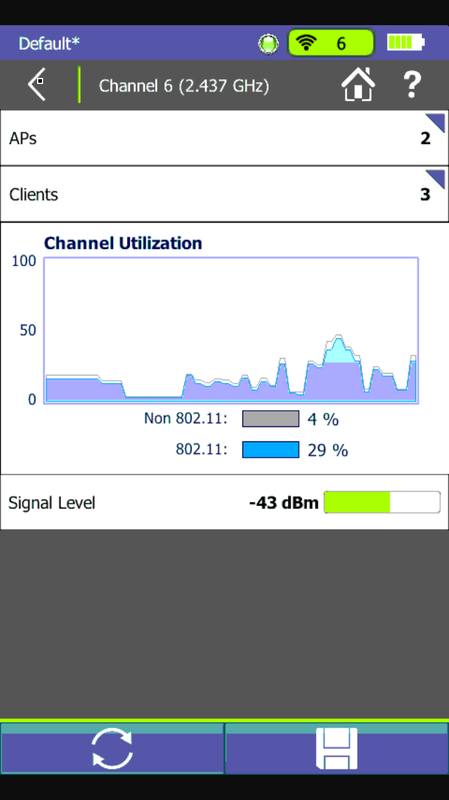
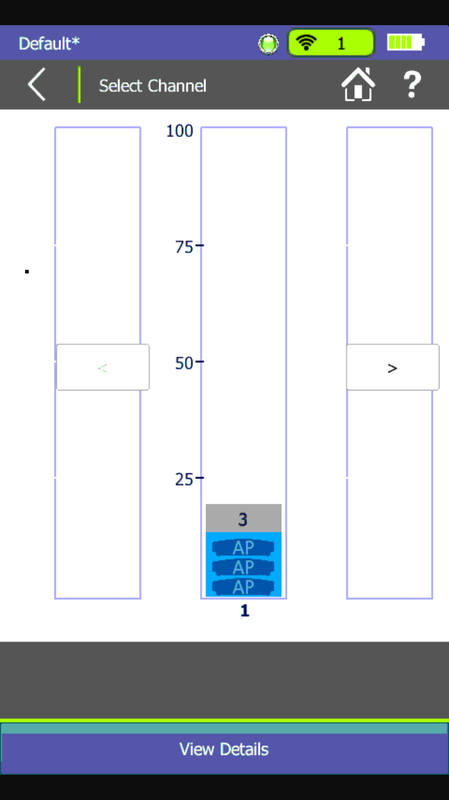
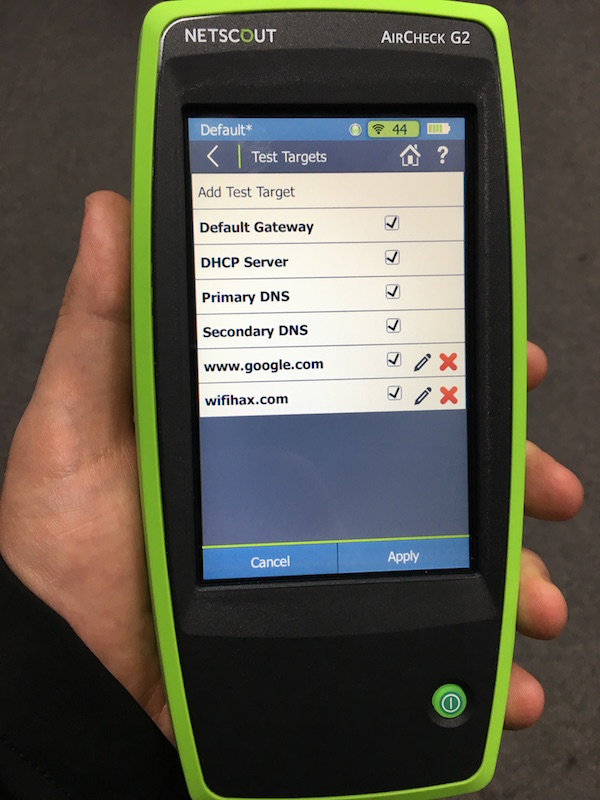
The channel utilisation screen is much like the previous AirCheck with a bar for each channel in which dots report Access Points detected, blue bars report channel utilisation caused by 802.11 sources and grey bars represent non WiFi utilisation. This is a great screen for a rapid view of the WiFi environment. Note though that this is not a spectrum analyser. Selecting a channel from here presents a more granular look at utilisation, signal level in dBm and direct access to view the clients and Access Points which are operating on the channel. 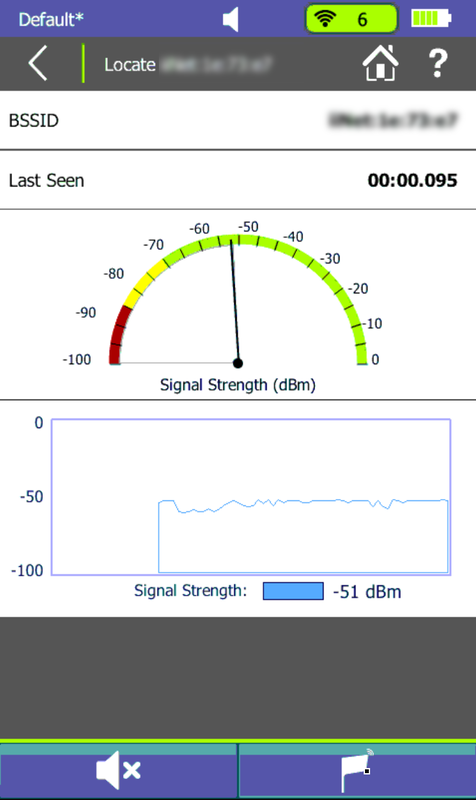 Hunting down specific Access Points or clients is made easier with the Locate feature, which is an option if you select a specific station from either the Access Points or Clients lists. I liken an AirCheck in this mode to a security guards handheld metal detector for WiFi Engineers. You’ll hear beeps increasing in frequency as you near your target (this can be muted if you are hoping for a silent kill) and the signal strength indicator and histogram assist in human computed trilateration. If client or crowd density, time to find or large distances are factors in your search then the exorbitant directional antenna option would be handy. This allows the operator to better isolate the direction in which signal from the station is at its strongest. Simply seeing whats nearby is cool but testing the network is where the AirCheck G2 begins to pay for itself. With the ability to associate to WPA2 Enterprise network (and all lesser options) with a great variety of EAP options the AirCheck can squash the time required to audit and test connecting to wireless networks. This is a good idea after deploying new infrastructure. You can even pre-load network profiles via the management software available for 64-bit Windows 7, 8 and 10 devices. Once connected you can perform roaming tests with detailed logging and check connectivity to DHCP, gateway, websites and DNS. Some of this data is then uploaded to Link-Live (for cloud logging) or full session data can be exported to the Windows management application.
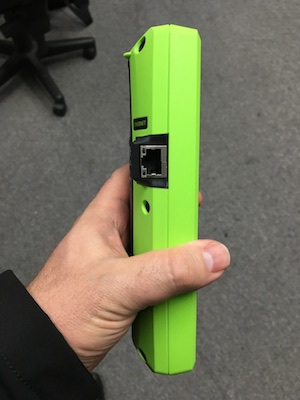
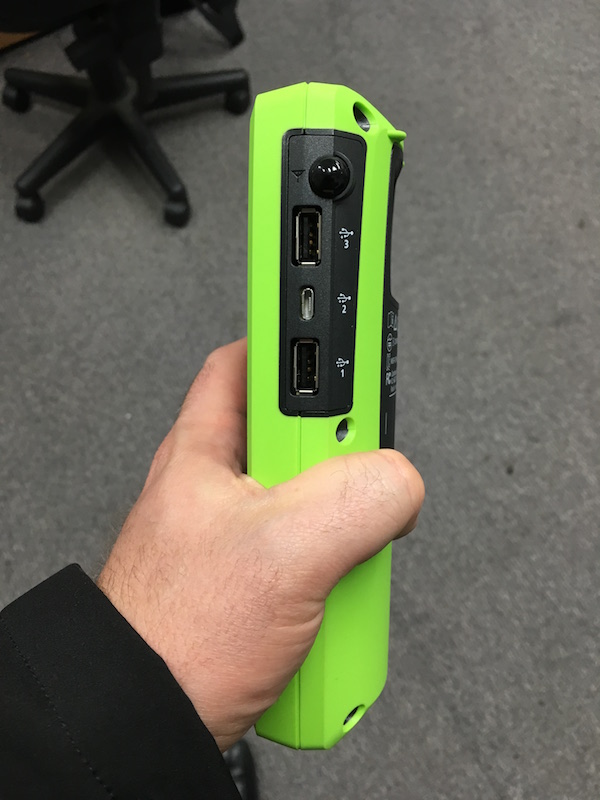
Curiously, the right hand side of the AirCheck G2 is home to three USB ports. On that note I will finish up with one word: Roadmap Loves:
I would Love:
If you are not already standing and shouting at your computer “Shut up and take my money” let me know why in the comments below. If you are interested in buying one (Australia/NZ and Asia Pacific readers) then let me know here.
Links: AirCheck G2 - Virtual Test Drive & Product Specs AirCheck G2 - Overview Video WifiHax at CWNP - Dilip Advani demonstrates the AirCheck G2 live |
WifiHaxWe build and optimise networks. Continuous learning is our secret to being good. Along the learning journey we will share things here... Archives
November 2022
Categories
All
|


 RSS Feed