
|
Aruba Central licenses switches in different classes from the Aruba switch portfolio. Here is the current class mapping for each switch type:
Comments
The deadline for support on ClearPass 6.9.x and 6.10.x is coming up in May - 31st May 2024 to be precise. Many people are looking at their options for upgrade and may be confused. Part of the confusion comes from the need to install ClearPass as a new appliance. The operating system underlying the ClearPass platform is changing from 6.11 onwards and requires a fresh appliance install rather than an upgrade as many ClearPass administrators are used to. There has been plenty of warning of this change but now there is less than a month to complete the task while remaining supported. Another confusion occurs if you are looking at the Software Updates dashboard within ClearPass Policy Manager. In my virtual appliance running 6.10.8 I can see an "Upgrade" for 6.12.0 with the option to download.   You won't receive a warning about not being able to upgrade from a version below 6.11.x until you have downloaded this upgrade and clicked install. Even then the option to proceed is presented in this popup. Don't bother. ClearPass Policy Manager backups containing configuration data from the following versions can be restored in 6.11:
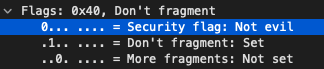
Direct upgrades to 6.12.0 are only supported from 6.11.x or any hotfix applied to it, with some caveats noted here: https://www.arubanetworks.com/techdocs/ClearPass/6.12/Installation-Guide/Content/UpgradeUpdate/Up-VersionConsiderations.htm RFC 3514 proposes to make the job of network enforcement appliances much simpler by flagging network packets related to a malicious intent with a security flag. The flag simply allows a 0 or a 1 bit to be set where zero indicates the packet has no evil intent. If the bit is set to 1, the packet has evil intent. Secure systems SHOULD try to defend themselves against such packets. Insecure systems MAY chose to crash, be penetrated, etc. If you are a security conscious network engineer or administrator and utilise Wireshark to analyse packets you can enable this security flag interpreter under the IPv4 settings of Wireshark. Look for "Interpret Reserved flag as Security flag (RFC 3514)". 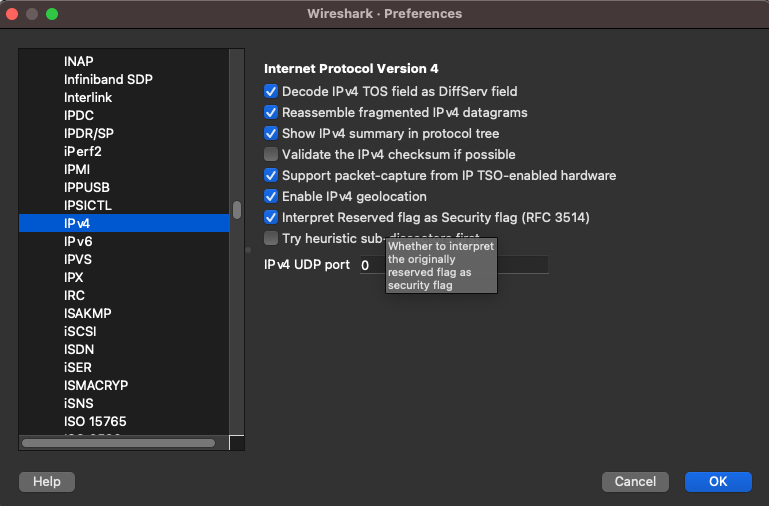
Sony PlayStation allows remote play using the PS Remote Play app available on mulitple operating systems (including for mobile). I recently got given a Backbone One controller which allows me to put my mobile phone into its dock and use the familiar controls for gaming. It's convenient for travel but also useful at home when you can't play wherever your PlayStation is located.
The PS Remote Play app will switch your PS5 on if you have configured the appropriate settings and usually the performance over Wi-Fi is pretty good. I do have a lot of wireless clients on my network however and there are times when the lag just gets unbearable. It can appear as glitchy graphics which can really impact negatively on gameplay, or sometimes it's just stuttering audio. To improve this situation I started investigating what the traffic between the PS5 and client was and whether it could be prioritised over the network. I was able to find the traffic on my network using packet captures and could see that the stream of data between my mobile and the PS5 was using UDP. The ports ranged from 9295 through 9304. I was able to quickly mark traffic through my Aruba Wi-Fi using an access rule within the SSID I use for my mobile phone. The access rule looks for UDP traffic on ports 9295-9304 to the destination IP of my PS5, it then marks that with the DSCP tag 32 (CS4). 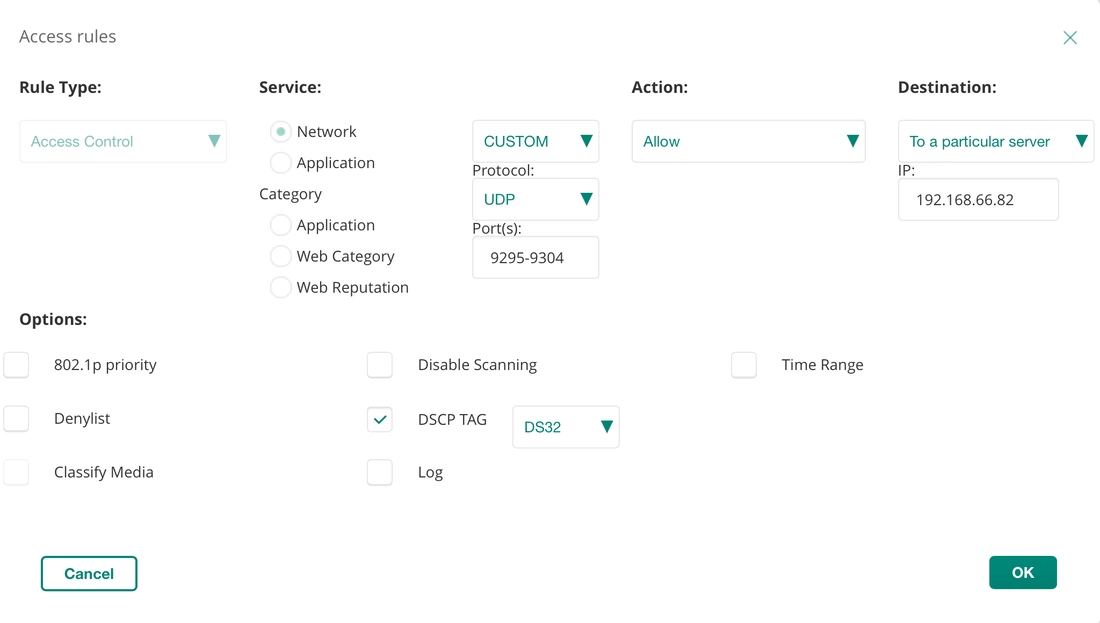
Aruba Central Wi-Fi Access Rule Configuration
Traffic with this mark is prioritised through the Wi-Fi in the direction of client to PlayStation but the bulk of the traffic is actually in the opposite flow (PS5 to client). This is what holds the video and audio. If the PS5 was a wireless client also then this rule could be modified to not include itself as the destination. Or duplicated with the client IP as the destination to cover both directions in two rules.
In my case the PS5 is a wired client, so instead of marking the traffic from the PS5 at the Wi-Fi infrastructure I can mark it within the switch which means the switch outbound queuing will take it into consideration also. In an Aruba OS switch configuration classify the traffic with the below classifier:
Create a policy which marks the matched classified traffic:
Finally, apply the qos policy to the VLAN or physical interface that the PS5 connects to:
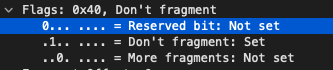
Within the IP protocol details in a captured packet using Wireshark you can see the Differentiated Services Field is marked as 32 which represents the Class Selector 4. The switch also marks packets with this DSCP marking to priority 4 which is marked in the 802.1q VLAN tags if it were to leave the switch to another switch for example.

DiffServ details in Wireshark
The Aruba Access Point honours this DSCP mark and forwards the packet appropriately over the air. CS4 matches to the Wi-Fi Multimedia (WMM) Video Access Category (AC_VI) which will provide it an advantage for transmission opportunities over the best efforts and background categories.

WMM Priority for Wi-Fi Frames
So marking the traffic close to the source is important. The most beneficial mark in this case comes from the switch that the PS5 is plugged in to. The AP honours it and passes the traffic over the air with higher priority using WMM. The access rule on the AP marks return UDP traffic from the client (the PS Remote device) so that it reaches the PS5 with higher priority. This traffic is likely to contain controller (button press) data so it can't hurt to prioritise it.
These QoS capabilities could be used for all kinds of applications. What have you used QoS for?
It is possible to temporarily change the prompt that is appears on every line within macOS and other operating systems which present a bash style terminal. You may want to customise this during a demonstration or screenshare rather than showing off your computers hostname and username.
When you open Terminal in macOS, for example, you are operating a Z shell. Older versions of macOS used Bash. By default, the prompt will show the username of the currently logged in user, followed by @ and the hostname of the computer you are using. 
To change this temporarily you can use export.

|
WifiHaxWe build and optimise networks. Continuous learning is our secret to being good. Along the learning journey we will share things here... Archives
May 2024
Categories
All
|
 RSS Feed