|
You can create custom date and time strings relative to "now" with the [Time Source] Authentication Source. This was useful recently when I needed to customise the expiration of MAC caching on Guest devices.
Instead of having the MAC Caching last until the Guest Account expired, or a day or week from now I wanted the caching to last until midnight of the current day. Here is how I achieved it. In the ClearPass Guest Authentication with MAC Caching template an attribute is written to the endpoint called "MAC-Auth Expiry". The value of the caching duration is derived in the MAC Caching Settings tab of the service template configuration wizard. By default it would be set to the Account Expiry Time using %{Authorization:[Guest User Repository]:ExpireTime} in the MAC Caching enforcement profile. to edit.
Note: I have used the prefix "deleteme" when using the Service Template so that I remember do remove the components it creates for this demonstration.
The value of Expire Time is extracted from the Guest User Repository so that it matches the Guest Account expiration when written to the Endpoint attribute.
The variable changes somewhat if you set the expiration to One Day or One Week however. Instead of pulling information from the Guest User Repository it instead uses the Time Source, which is a based on a SQL query.
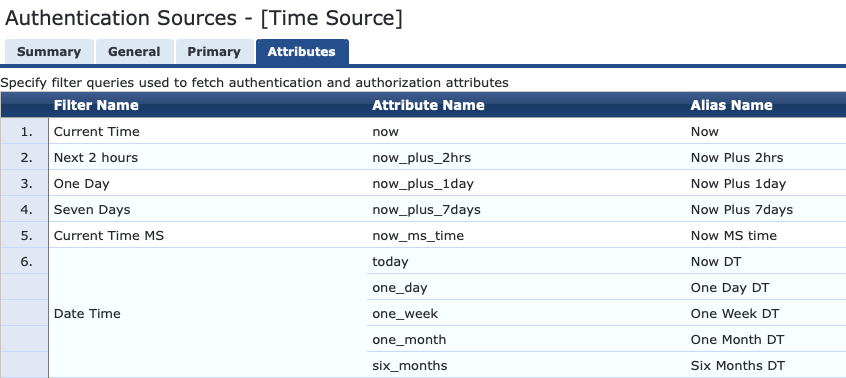
"One Week DT" is just one of the options available by default as part of the default Time Source configuration. It references the following SQL query which pulls the current time rounded to the hour and adds 1 week.
There are various other examples built in to the time source such as Now DT, One Day DT, One Month DT and Six Months DT. These all display in a clear to read Date-Time format of YYYY-MM-DD HH:MM:SS. There are various other aliases that return an integer value relative to Epoch. I am less interested in calculating the time from a number so I will focus on the more readable form.
To create a variable which would return my desired result I added an additional filter to the Time Source. This is found in the ClearPass Policy Manager under Configuration --> Authentication --> Sources.
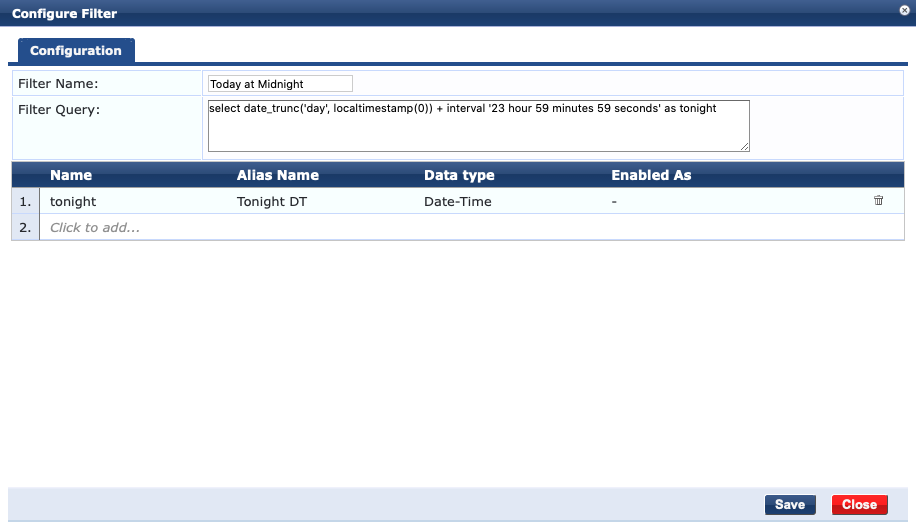
I called the Filter "Today at Midnight" and used the following Filter Query:
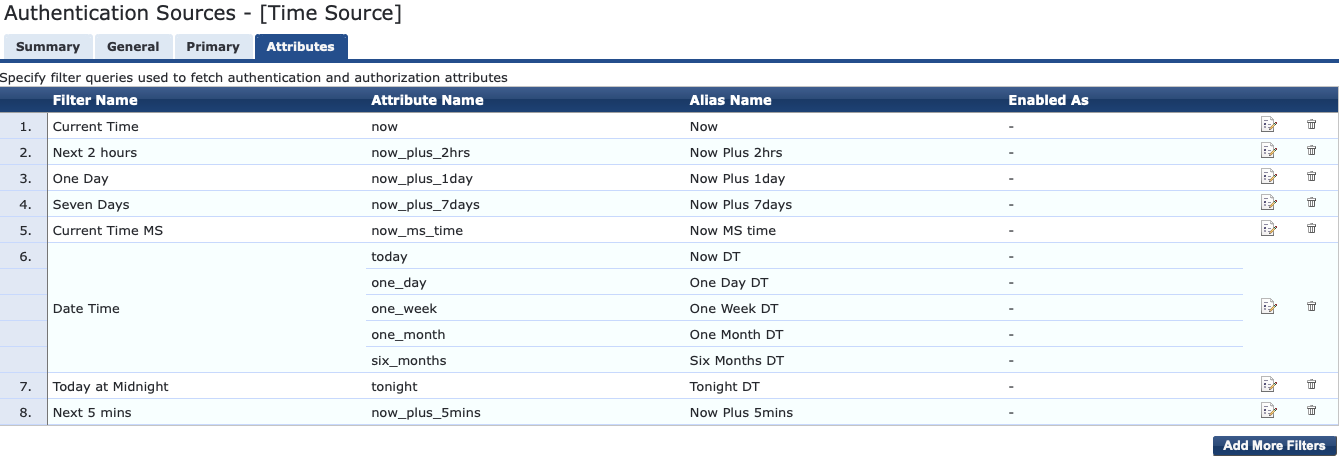
This query rounds the date-time to the current day and the time component is represented as 00:00:00. It then adds 23 hours, 59 minutes and 59 seconds resulting in data in the form of YYYY-MM-DD 23:59:59 (where YYYY-MM-DD is the current day). I then referenced tonight with the Alias Name of "Tonight DT" so I can use that in my Enforcement Profile variable.
Save the filter and the Time Source.
Now go to Enforcement --> Profiles and find your Guest MAC Caching profile for your service. In the Attributes tab of the profile edit the Endpoint Attribute Value for the MAC-Auth Expiry so that it uses the new Time Source variable.
When a Guest successfully authenticates the Guest MAC Caching enforcement profile is called by the "User Authentication with MAC Caching Enforcement Policy". You will see it as one of the multitude of Actions taken.
The "MAC Authentication Role Mapping" policy (as created by the service template) is referenced by the "MAC Authentication Enforcement Policy". Notice in the first condition which defines the TIPS Role of {MAC Caching] checks the Endpoint MAC-Auth Expiry attribute and ensures that the present time is less than it.
Now DT actually is rounded to the hour if you inspect the SQL query. I found this out when I was testing and had used an expiration of 5 minutes from now by using the following SQL query. Because of this, Now DT would not be granular enough if you needed expiration to occur in periods shorter than one hour and may require some further modification. There are possibly better ways to attack such a scenario however. Because "Now DT" will not be less than %{Endpoint:MAC-Auth-Expiry} at precisely midnight this works as expected.
The result of all of this is that upon subsequent MAC Authentication requests beyond the first date of connection the device is presented with a Captive Portal. In my use case this was a customised web-login page which required the username to be entered to resume the session. This would occur all the way until the Guest Account Expiration disables the account (which could be weeks, months or longer in to the future).
Let me know if this helps you out by commenting below or sharing in your social feeds.
Comments
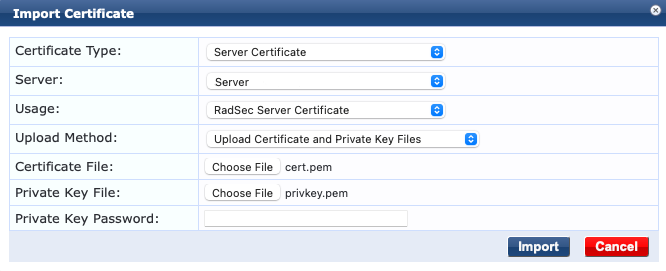
This article covers a very specific case when you are importing a certificate and private key pair where the private key does not have a password. It does not explain the certificate types or use cases, certificate and key-file file formats or detail the intricacies of PKI. ClearPass requires certificates in order to operate securely (encrypt/decrypt traffic) and identify itself during RADIUS transactions. The most common certificates you would import are RADIUS, HTTPS and RadSec. There are others but these all require a private key. ClearPass allows you to import the certificate and private key as two separate files (you can also import them as a combined file). It is quite common to receive a private key file that is not protected by a password, whether it be from a public certificate authority or an internal CA service. When you try to import this file pair into ClearPass while leaving the "Private Key Password" field blank you will receive an error: The error states that the Private Key Password must be specified. The problem is there isn't one to be entered, so it can be confusing how you may proceed.
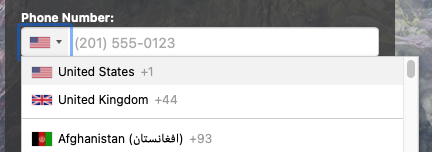
You can get around this error by entering anything (I haven't exhaustively tested every possible entry) into the Private Key Password field. During my first attempt I used "null", which worked. Then I used "asdf" which also worked. A simple, single character entry also appeared to work fine. When using phone numbers in ClearPass guest self-registration, the system elevates US and UK to the top of the country codes selector by default. This isn't always suitable so you may want to change the country codes that are promoted to the top to be more appropriate for your user base. Generally this will come up when you are building a Guest Self-Registration workflow - but it may be relevant for any page which shows a phone number field in a ClearPass form. It is possible to edit the settings of the most commonly used visitor_phone Base Field. This should result in an update across all Forms which use this Field. This can be done from the ClearPass Guest Configuration page.
It is possible to edit this field on a per form basis so that portals and pages can have differing preferred country codes. This may be appropriate for ClearPass deployments that cater to global or multi-national use-cases.
Aruba Downloadable User Roles (DUR) uses HTTPS. When the DUR is being issued by Aruba ClearPass the switch must trust the HTTPS certificate that the ClearPass server uses. The Certificate Authority intermediate certificate must be loaded into the switch as a trusted authority certificate. The public HTTPS certificate is automatically downloaded to the switch when a radius-server host, with type ClearPass, is configured on the switch (e.g. radius-server host <ip-address> clearpass).
To enable useful debugging certificate issues the following commands will work on an ArubaOS Switch.
If the switch detects any issues with the HTTPS process during a radius request which results in a DUR a debug message should be logged to the session window. During the SSL session there may be a lot of messages (it is noisy). Use 'no debug security ssl' to disable those messages.
When DUR works successfully the issued User Role will be specified in the Port Access Client Status output. To see information about the user-roles available and issued use the following show commands.
 Today we're testing Aruba ClearPass Policy Manager to show that a disabled user in Active Directory will not be successfully authenticated when connecting to a WLAN using 802.1X In ClearPass it is very easy to follow and deep-dive into the information of all access request attempts using the Access Tracker. Access Tracker can be accessed from Monitoring —> Live Monitoring in the left hand navigation menu. Access Tracker has a wealth of information which can be viewed in multiple ways and is so important to a ClearPass administrator that it deserves its very own browser tab when you are making changes to and testing new configuration in ClearPass. Here in Access Tracker we can see an access event where user “matt" requests and is granted access with a resulting enforcement profile of [Allow Access Profile]. You can see the Authentication method is EAP-PEA with EAP-MSCHAPv2 which is common in a Windows Domain, the authentication source is the AD to which the ClearPass server has been joined. The Authorisation source is "WFHX AD” which is the same domain but it has been setup in such a way that ClearPass can access attributes of domain accounts (both computer and user). Here is another access event showing the same user “matt” requesting access but being denied. The domain account for “matt” was disabled. You can see the authentication source is AD but the Authorisation source is not used this time as the process does not progress beyond the rejected authentication attempt. |
WifiHaxWe build and optimise networks. Continuous learning is our secret to being good. Along the learning journey we will share things here... Archives
May 2024
Categories
All
|







 RSS Feed